ZSH and PowerLevel10K for Beauty and Speed on MacOS & Debian Systems
In this comprehensive tutorial, I’ll guide you through the process of installing/configuring ZSH shell both on MacOS and Debian systems, personalize it with the ohmyzsh framework and elevate your experience with the stunning PowerLeve10K theme.
Before proceeding with the installation, please ensure that Git is installed on your system. To install Git using homebrew on macOS, run the following command:
1
brew install git
For Linux users, you can install Git with homebrew or your Linux distro’s default package manager, on debian systems simply run the following command:
1
sudo apt install git -y
Having Git installed is essential for the successful completion of the installation process. Make sure to execute the appropriate command for your operating system to ensure Git is properly set up.
For Mac users, I highly recommend Homebrew as a package manager. You can easily install it by running the following command in your terminal:
1
/bin/bash -c "$(curl -fsSL https://raw.githubusercontent.com/Homebrew/install/HEAD/install.sh)"
Additionally, I suggest using iTerm2 as an alternative to the default macOS terminal. You can swiftly install iTerm2 using Homebrew with the following command:
1
brew install --cask iterm2
You have now gained access to a powerful package manager and an enhanced terminal experience on your Mac system. Get ready to unlock the potential of your command-line interface and embark on a journey of enhanced productivity and visual aesthetics.
Let’s dive in!
Table of Contents
- Step 1: Install ZSH on your system
- Step 2: Change your default shell to
ZSH - Step 3: Restart your terminal
- Step 4: Install
Oh-My-Zsh - Step 5: Install PowerLeve10K theme
- Step 6: Download and install Nerd Patched fonts
- Step 7: Download Plugins for
autosuggestion - Step 8: Edit your
~/zshrcfile - Step 9: Change your terminal font from preferences
- Step 10:
p10kconfiguration - Bonus
- Summary
- Source
Step 1: Install ZSH on your system
Open your terminal, copy and paste the following commands
On Debian systems:
1
sudo apt install zsh
On MacOS zsh is the default shell environment, but you could install it with the following command:
1
brew install zsh
Step 2: Change your default shell to ZSH
Step 2.1: Identify your current shell
1
echo $SHELL
Step 2.2: Make sure it is set to zsh
1
chsh -s $(which zsh)
Step 3: Restart your terminal
Close your terminal and open it again to allow the changes to take effect. Then type echo $SHELL at the prompt to verify the shell, it should output something similar to /usr/bin/zsh or /usr/local/bin/zsh depending on your environment.
Step 4: Install Oh-My-Zsh
Paste this command in your terminal and hit enter to install Oh-My-Zsh
1
sh -c "$(curl -fsSL https://raw.githubusercontent.com/robbyrussell/oh-my-zsh/master/tools/install.sh)"
Step 5: Install PowerLeve10K theme
Clone the repository into the custom theme directory.
1
git clone https://github.com/romkatv/powerlevel10k.git $ZSH_CUSTOM/themes/powerlevel10k
Step 6: Download and install Nerd Patched fonts
Download and install FiraMono Nerd font. It’s best and works everywhere. I highly recommend FiraMono for Linux (Ubuntu) systems otherwise your terminal may not display the font properly.
Step 7: Download Plugins for autosuggestion
1
git clone https://github.com/zsh-users/zsh-autosuggestions.git $ZSH_CUSTOM/plugins/zsh-autosuggestions
and syntax highlighting
1
git clone https://github.com/zsh-users/zsh-syntax-highlighting.git $ZSH_CUSTOM/plugins/zsh-syntax-highlighting
Step 8: Edit your ~/zshrc file
- Use vim/nano editor to edit your
~/.zshrcfile to use thePowerLeve10Ktheme,Awesome Patchedfont,Autocorrection,AutosuggestionandSyntax highlighting.
1
vim ~/.zshrc
Find the ZSH_THME line and replace it with
1
ZSH_THEME="powerlevel10k/powerlevel10k"
Also add the below line to use Nerd Patched fonts
1
POWERLEVEL9K_MODE="nerdfont-complete"
To enable auto correction uncomment the line by removing the # from
1
#ENABLE_CORRECTION="true"
it should now look like this
1
ENABLE_CORRECTION="true"
Now we will add plugins so scroll down a little until you find plugins=(git), or just search for it, add the plugins we just downloaded, like this
1
plugins=(git zsh-autosuggestions zsh-syntax-highlighting)
that’s it, save and exit the editor.
Step 9: Change your terminal font from preferences
On Debian systems
I illustrate here with Ubuntu, however, the process should be the same on other Debian systems. Go to preferences of your terminal and change to the custom font you just installed. If it doesn’t shows up you can try this.

You can set any font using dconf (e.g. in dconf-editor), under /org/gnome/terminal/legacy/profiles:/:<profile-id>/font.
On MacOS
Go to the terminal preferences

Click on profiles, find the change button under the Font section, search and select FuraMono.

Set your new theme to default and restart your terminal.
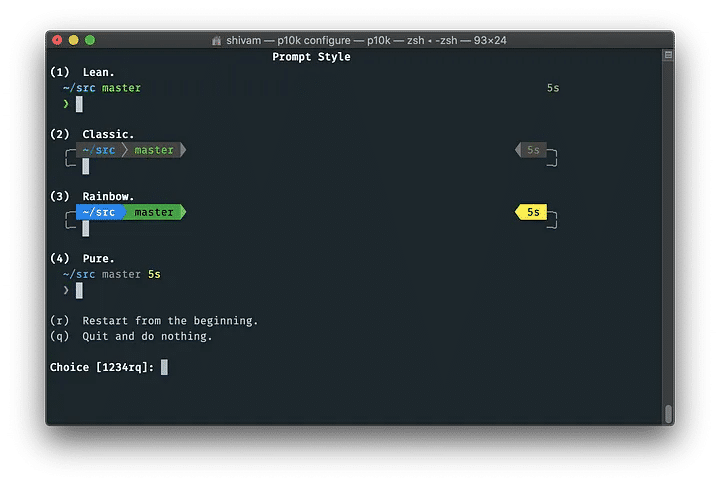
Step 10: p10k configuration
Run p10k configure command to setup your terminal looks.
1
p10k configure
Follow the instructions on the on screen. In the last step select option 3 which is verbose and then hit Y.

Bonus
Customize the Font Family in the VSCode Terminal
Following the steps below to change the font family in the integrated terminal in Visual Studio Code to "FuraMono Nerd Font".

Open Visual Studio Code.
Go to the “Settings” by clicking on the gear icon in the lower-left corner or by using the shortcut Ctrl + , (comma).
In the search bar at the top of the settings panel, type “terminal.integrated.fontFamily” and press Enter.
Locate the “terminal.integrated.fontFamily” setting and click on the “Edit in settings.json” button to open the configuration file.
- In the
"terminal.integrated.fontFamily"property, add"FuraMono Nerd Font"as the font family value.Make sure to enclose it in quotation marks.
Example:
"terminal.integrated.fontFamily": "FuraMono Nerd Font" Save the changes and close the
settings.jsonfile.- Restart Visual Studio Code to allow the new font settings to take effect.
Fix permission issue in ZSH
If you encounter a permission issue in ZSH, it can be resolved by addressing insecure directory permissions and ownership. When such issues arise, ZSH may disable completions for safety reasons.
1
2
3
4
5
[oh-my-zsh] Insecure completion-dependent directories detected:
lrwxr-xr-x  1 rafael  admin  88 Apr 28 15:51 /usr/local/share/zsh/site-functions/_brew_services -> ../../../Homebrew/Library/Taps/homebrew/homebrew-services/completions/zsh/_brew_services
[oh-my-zsh] For safety, completions will be disabled until you manually fix all
[oh-my-zsh] insecure directory permissions and ownership and restart oh-my-zsh.
[oh-my-zsh] See the above list for directories with group or other writability.
To fix this, you need to manually rectify the directory permissions mentioned in the provided error message. By ensuring secure permissions and ownership, you can reinstate the completions functionality. After making the necessary adjustments, remember to restart oh-my-zsh to apply the changes. By taking these steps, you can resolve permission-related problems and restore the full functionality of ZSH.
Open your .zshrc file in your editor of choice, I personally like neovim
1
vim ~/.zshrc
and add this line before the # Path to your oh-my-zsh installation.
1
ZSH_DISABLE_COMPFIX=true
it should now look like this:
1
2
3
# Path to your oh-my-zsh installation.
ZSH_DISABLE_COMPFIX=true
export ZSH="/Users/"YourUserName"/.oh-my-zsh"
Restart your terminal and everything should work fine.
WebSearch with google from the terminal
Performing a Google search directly from the terminal is a nifty trick that can save you time. Follow these steps to set it up:
1- Open your favorite editor and access your .zshrc file:
1
vim ~/.zshrc
2- Locate the line containing the plugins and add web-search as shown below:
1
plugins=(git zsh-autosuggestions zsh-syntax-highlighting web-search)
3- Save the changes and exit the editor. Then, reload your environment by running:
1
source ~/.zshrc
4- You are now ready to launch Google searches directly from your terminal. For example, to search for “cat memes”, type the following command:
1
google cat memes
You are now able to quickly search Google without leaving the comfort of your terminal.
Summary
By following the steps outlined in this tutorial, you’ve transformed your command-line interface on both MacOS and Debian systems using ZSH and PowerLevel10K.
Throughout the process, we installed ZSH, set it as the default shell, and incorporated Oh-My-Zsh to add extra functionalities.
We took things even further by personalizing our shell with the visually captivating PowerLevel10K theme, giving it a stylish and appealing look. Plus, we supercharged it with plugins for autosuggestions and syntax highlighting, making our command-line experience even more efficient.
To top it all off, we effortlessly changed the terminal font, enhancing the visual aesthetics to suit our preferences. Now armed with these fantastic enhancements, you can enjoy a seamless and visually appealing command-line journey that’s both functional and stylish.